


Hello, world! How are you, friends? I have been well. Life is good. It's amazing how well a body can adjust to minimal sleep. I am definitely a regular coffee drinker now. Especially if I can have it with some pound cake. There will always be time for coffee and pound cake.
Enough chit chat. I have news.
Purple Workbench is getting a facelift!
I've hosted three creative retreats so far. They've been great. A lot of work, but the feedback has been ever so encouraging.
Maternity leave with my amazing daughters will wrap up at the end of the summer, and I will be returning to my full-time day job at the end of this summer. But I've been doing a lot of thinking, and I think I'll have it in me to continue with these retreats. So much so, that I've spent the last gazillion hours working on a new website and rebranding Purple Workbench slightly to reflect how excited I am about this new focus!
Four retreats a year. One for each season. The first will be held September 25 - 27th, again, at Cobblestone Farm in rural Cobourg, Ontario.
And you're invited into my home: the kitchen, the sewing room. I'm going to plan some fun stuff for us to do together.
So keep an eye out for Facebook updates. I'll tweet something. Check the website in a week or so. The email list will be wiped, so you'll have to sign up again when the new site is up, sorry!
Thanks for hanging around. Fun times ahead.
Big changes ahead!
My new sewing haven
The moment is here! Oh, not that. Baby is still very much in my belly. Due date is on Monday. Eek!
The excitement of the now is our new renovation!
Dustin and I never had the intention of staying in our current house for this long. It's the age old story of being thoroughly shocked at housing prices in Toronto and rethinking the need to move...
When we finally made the decision that we would stay in this house for at least few more years (likely longer), we decided it was time to invest some money into making us love it more. With the second baby on its way, Lily was moving to the guest room which had doubled as the office/sewing space for Dustin and me. I needed a new sewing haven.
We live in a narrow townhouse with no basement (it was built atop an old gas station, so I guess this was the simplest way), and our garage is attached to the rear of our house. The ground floor is an awkward through-space that is the width of our house, but leads from the front door and upper levels to the laundry/furnace room and garage. We had a large Expedit storage unit from Ikea against the wall, and a couple chairs near the entrance for luxury seating while husbands waited for their wives to say goodbye for the 40th time.
It was time to make the space more useful. To make an incredibly long story short (Dustin wanted to DIY, I wanted to just pay someone to get-er-done), we contracted California Closets to design and build the mudroom/office space (see who won?). It was very much a collaborative effort in designing the space, and now that I've been using it for a little over 2 weeks, I can confidently say I'm thrilled with the result.
And the moment has arrived to reveal the space to you!


1. I couldn't figure out how best to store my 24 inch ruler. I wanted it accessible, but not just on the table buried under everything. The last time I had a dilema with this ruler, I sewed a chic ruler caddy for transportation to and from my quilting class. It seemed perfect to just hang the thing on the wall using some grommets and finishing nails. I also use it to hold my scissors, rotary cutter, and other commonly used tools. When on the go, I just take it off the wall, fill it up with whatever else and roll it up for transport! Here's the original post I wrote about this ruler caddy.
2. I am getting so good at curtains! I sewed a set for Lily's room (that room is never clean enough for pictures...) and then decided that this new sewing space deserved new window coverings too. The workroom received some new Joel Dewberry fabric a couple weeks ago, and I fell in love with the Egg-Blue Crysanthemum print. It also just happened to match my Olfa cutting mat. I used a wonderful tutorial from Design Sponge to sew the curtains and have learned that taking the time to measure and cut everything is key to simplifying the sewing.
3. I toyed with the idea of buying new fancy baskets or bins for all my fabric, but regular clear plastic tubs are just too practical. I use the Rubbermaid "Roughneck" from Canadian Tire for about $10 a bin. Nice and heavy duty. This is where I sort my leather, batting, wool, jersey, Liberty Lawn, and other big fabrics. I have one called "on the go" for when I need to throw together materials and tools needed for a project I'm working on outside my home.
4. I use smaller clear containers for my quilting fat quarters and scraps. I sort them by colour and share two colours per bin. I also use the smaller clear containers to organize my notions. They sit just above my sewing space for easy access: thread, elastic, pins, buttons, zippers etc. Again, I've thought about getting prettier containers: vintage tins, colourful boxes. But right now, this is what works. I like being able to see what's in the containers.
5. My desk light: the Uberlight by Reliabe. I love it. It's a little spotlight for exactly where I need some extra focus. And because it's LED, it's energy efficient and doesn't cook your face when you're already sweating from trying the invisible zipper for the third time.
6. That's my new blouse. In Liberty Tana Lawn. It deserves a post on its own, so I won't spoil all the details. The neat thing here is that it's hanging on valet rod. I asked them to install one so I could hang my finished shirts and dresses up. It's the little things that make me really love my new space!


Posted in
fabric,
organizing,
sewing
5 Comments
Rhubarb pound cake and cupcake variation

Just over a year ago, I shared about my new-found love for pound cake. It was a big moment for me. I was growing up. I had stumbled upon a basic pound cake recipe that was so incredible that I baked six of them for my birthday picnic. I was asked for the recipe over and over.
This pound cake has changed lives. Or so I've been told.
I think I've made it over a dozen times since then. And I have a child. A time-consuming, sleep-depriving, wonderful child. It's that good. And simple.
Most recently, I've been in love with a variation involving rhubarb.

I was first introduced to rhubarb when my family lived in a tiny village in England. (I kid you not, this village was named Crapstone. I remember exchanging letters with my penpals and I think their parents forced them to incorrectly address the letters to Crabstone because the alternative was just absurd.)
In England, at least my version of small-village-country-side-England, rhubarb was eaten in the form of a runny pink stew, topped with an equally runny goop of custard. I wasn't a fan. Perhaps I was too young to appreciate the tartness of the rhubarb cutting the richness of the custard. It's on my list of things to try again with my grown up adult palette.
Too bad I hoard all my rhubarb for pound cakes. The stewed rhubarb will have to wait.
I love Ontario rhubarb season. It's nice and long. There are plenty of organic options available through farmer's markets and food co-ops. And I have a handful of friends who grow it in their backyard and are so generous as to offer me some.

I use that basic recipe I shared last year and with a couple minor changes, including the addition of 3 cups of chopped rhubarb to produce a perfectly tart and crummy pound cake. I think I maybe even used 4 cups of rhubarb last time since that's what the bunch turned into. It just means a slightly softer slice of cake since the rhubarb gets just a tad mushy.
I made two loaves for the Summer Farmhouse Retreat.
I made two loaves for a summer BBQ.
I made two loaves just for me to devour at home.


Last week I took the day off to catch up with my good friend Danielle; she recently dove head first into an exciting new sewing career. It was Tuesday. A week after her birthday. A week before mine. It was necessary to celebrate with some more rhubarb pound cake.
As a variation to the variation, I made them into cupcakes topped with whipped cream and a fat strawberry. Rhubarb and strawberries are a superb duo. Like oreos and milk. Or Elsa and Anna.


We are at the tail end of Ontario Rhubarb season. I still saw some at the food co-op today. (West End Food Co-op has local, organic rhubarb for $2 a bunch!) Go! Now! get some rhubarb! And if you can't make it right now because your toddler wants you to watch Frozen with her for the hundredth time, then just wash it, chop it up, lay out on a baking sheet and freeze. You can transfer to a ziplock bag and use later!
Rhubarb Pound Cake (and cupcake variation)
Adapted from Molly Wizenberg's recipe
1 cup (2 sticks) unsalted butter, room temperature
2 cups sugar
2 cups flour
1 tsp salt
1 tsp baking powder
5 large eggs
1 cup (2 sticks) unsalted butter, room temperature
2 cups sugar
2 cups flour
1 tsp salt
1 tsp baking powder
5 large eggs
3 cups of chopped rhubarb
Preheat your oven to 350 degrees F. Line 2 small loaf pans with parchment paper. I do not recommend making this in one large loaf pan. The rhubarb releases a good amount of liquid and needs extra baking time to avoid being overly mushy. Using one large loaf pan would mean a drier crust with a center that is just set.
Beat the butter in an electric mixer on medium speed; add sugar and continue beating until light and fluffy, about 5 mins. In the meantime, mix together flour, salt, and baking powder in a small bowl. Set aside.
To the butter sugar mixture, add eggs, one at a time, beating well after each egg.
Scrape the sides of the bowl and add the flour mixture all at once. Mix on low until just incorporated.
Add the chopped rhubarb and mix on low again, 3 or 4 spins until the rhubarb is just mixed in. You can also do this by hand.
Give it one final scrape with the spatula to make sure everything's well blended. (Check that bottom tricky spot on the bottom of the kitchen aid mixer.)
Fill loaf pans and bake for 60 mins or until a poked skewer comes out clean.
Cupcake Variation
Prepare a muffin tin with 24 cupcake liners. The above recipe fills 24 cupcakes to the edge of the liner. You can choose to make 16 or 18 larger cupcakes but you may find that the batter tends to spill outward rather than growing up.
Bake in the same 350 degree oven for 30-35 mins or until a poked skewer comes out clean.
Make whipped cream topping with 1 cup of heavy cream and 2 tablespoons of sugar.
Whip until light and fluffy.
When the cupcakes are cool, top with whipped cream and a big fat strawberry.
Posted in
breakfast,
dessert
Leave a comment
Buttered Spring Peas

So many wonderful things happen by accident.
Like when I thought I was scooping up handful after handful of sugar snap peas at the Farmer's market for my Saturday dinner at the recent Farmhouse Retreat.
My own urban-patio-garden of sugar snap peas had just begun to flourish, so I naturally assumed the "peas" at the market must also be similar sugar snap peas. Silly me. Clearly, a more logical answer was that they were regular peas: just like the sign said.
I realized this quickly when it was difficult to peel and trim the ends. Instead, they easily popped open to reveal fat and sweet peas inside the pod.
What now?! I was going to make a crunchy sesame sugar snap pea side dish to go with my BBQ dinner. What to do with a small bowl of fresh peas?
The only thing I could think of was Top Chef, Season 5, when Carla Hall made a perfect dish of buttered peas to woo the judges in a "Last Supper" elimination challenge. I remembered praises of simplicity and perfect seasoning.
So that's what I did. Blanched in salt water. A dollop of butter. A little more salt. A squeeze of lemon.
Perfection. Devoured in seconds. What a lovely accident.
Ontario's growing season seems to be a little late this year; it was a doozy of a winter! But fresh peas should be around at farmer's markets for a little longer!
Go buy a pint or two. Find some
It's a little taste of spring even in the sweltering heat of summer.


Buttered Spring Peas
Serves 2-4 as a side dish1 pint fresh peas in their pod
salt
butter
lemon
1. Shuck the peas. Eat a couple to marvel at their sweetness.
2. Bring a small pot of salted water to boil.
3. Add peas to boiling water.
4. Drain when all the peas have started to float. If you prefer them less al dente then wait a minute or two after they've begun to float. I like them al dente.
5. Add a tablespoon of butter. Taste and season with salt (you'll be surprised how much salt they may need).
6. Squeeze some fresh lemon juice on top.
Posted in
dinner
Leave a comment
Quilting at the Farmhouse
 |
| Pow Wow Quilt Top by The Willow Nest |
As part of the retreat signup process, I asked the crafters to complete a quick survey to give me some ideas for sewing workshops that might be suitable.
I was surprised by how many people were interesting in learning how to quilt!
It will be a dream come true to dedicate an entire weekend event to quilting, but having a workshop start us off on the process is going to be such a great start!
And this could not come at a better time. While Magda is pretty much done her baby quilt, I have yet to even decide on a pattern for my own baby-to-come. Baby (gender inconclusive, I'm assuming divergent) is due at the end of August, and I think it's safe to say that I shouldn't assume I have time after August to work on the quilt.
This workshop will hopefully help me out with picking a pattern. I'm smitten with three patterns at the moment.

First, is the Pow Wow quilt: a great chevron pattern popping up all over the interwebs and is available from the Cluck Cluck Sew website. There are lots of fabric scrap possibilities and is hopefully quick and simple to sew together.
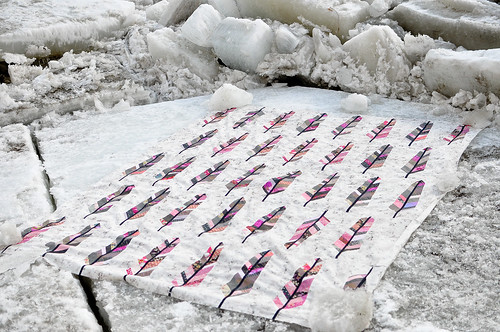 |
| Karyn's Feather Bed Quilt top |
| Elizabeth Hartman's Fancy Fox quilt from Oh, Fransson! |
So back to the farmhouse. The Saturday optional sewing workshop will be these three quilt blocks. The Pow Wow chevron will be a great beginner block to learn the basics of piecing; the Fancy Fox and the Feather Bed Quilt will be intermediate blocks for those seeking a bit of a challenge.
We will learn the techniques of piecing fabric, how to do a mini quilt sandwich, different techniques to quilt the layers together, and then we'll throw it together in the form of a pillowcase! Stuff with a $5 Ikea pillowform, and tada!
Oh, you can't imagine it? I guess I should practice and capture some pretty pictures before teaching this workshop. Stay tuned...
Too Cool For School (Days Jacket)

After my fairly good experience with the Seashore Dress, I decided to try another Oliver + S pattern.
The instructions are so clear, and I really love the variety in patterns they offer.
Lily was in need of a spring jacket. Her parka was finally becoming a little too warm, and her rain jacket didn't provide any warmth.
Oliver + S has half a dozen jacket patterns alone. I definitely loved the look of the School Days Jacket the most, and there are plenty of wonderful examples of this jacket online. One of my favourites is from the Probably Actually blog.
I purchased the wool from Downtown Fabric, after the always-animated owner, Daniel, convinced me to use a patterned beige wool. For the lining I chose Riley Blake's Rocket Stars quilting cotton from the workroom. I wanted to keep the jacket gender neutral to maximize reusability for Lily's future siblings...
As with my last Oliver + S pattern, I soon realized that the pattern called for far too much fabric. I had purchased 1.5 yards of wool, and easily could have fit the pattern onto a single yard; but the upside was that I had plenty of fabric to match those pesky stripes.
I sewed the size 3T, added a layer of quilt batting to the lining, and decided to sew the toggle closure rather than button closure.
It was plenty roomy for Lily and will definitely fit her this Autumn. Her sleeves are rolled up twice right now, so there's even a chance she could fit it next year! I struggle to understand why the Seashore Dress is a 4T for her and this 3T jacket is so roomy, but I'm really happy with the final product.
The stars really give the jacket such pizazz. The sewing was rather tough, but probably because I made it that way. Had I chosen a solid wool and not bothered to do a quilted lining, I would have had a much easier time!
Most of the reviews I've read about this pattern end by saying that the end product is well worth the effort. And I couldn't agree more! A confident beginner with a good level of patience will have such a great experience with this pattern!


Posted in
fabric,
sewing
2 Comments
Evan Martin Caught my Fish

Today was a crappy day. Headache, body aches, rain, sleep deprived.
I dragged myself into work and realized quickly it was not a great idea. At lunchtime, I called it quits and made my way home for an afternoon nap.
But not before I made a quick stop at Kensington Market. I'm sure if I had asked my doctor, she would have agreed.
My brother was coming over for dinner and I had originally planned on sending Dustin to grab some fish for dinner. I figured I'd make the quick stop before my nap.
I love going to Hooked. I like spending a little more money for the extra quality of fish, quality of service, and for that general fuzzy feeling I get when I leave there knowing I've done something good for the world and myself. Supporting sustainable fish is delicious.
I was hoping for some wild salmon that would taste good raw, hoping to slice it up and add it to our sushi DIY dinner.
Of course they had some beautiful King Chinook available, but the really fun part? They've now partnered with ThisFish: an online tool that traces the origin of your seafood from ocean to plate. Now, when Hooked stamps your bundle with their labels, they scribble down a number for you to trace your fish!

Evan Martin is a fisherman from Sidney, BC, and he caught my King Chinook that I ate for dinner. It was harvested off Kyoquot Sound between April 21st and 24th, was sold in Richmond BC, travelled to Hooked Inc. in Toronto, and then to my belly. How cool is this?! (Click the image below if you want to see the full summary of my fish trace on ThisFish.info.)

And how cool is sushi DIY? I came up with this concept a few years ago, when I was tired of standing in the kitchen making maki roll after maki roll and then having it not taste quite as good as when I first made it.

I use the packages of Korean style nori. They're small rectangles perfect for a little magical bundle of sushi ingredients. Like a miniature handroll. And the rest of the ingredients are up to your imagination.
After a ridiculously long afternoon nap, I made the sushi rice in the cooker, cut up cucumbers, avocados, kani (imitation crab meat), green onions, and the King Chinook wild salmon that Evan was so nice to catch for me. A little spicy mayo, wasabi, and soy sauce. Delicious! So many options at dinner time. And so much less work than making each maki roll for dinner!

Posted in
dinner,
toronto
Leave a comment